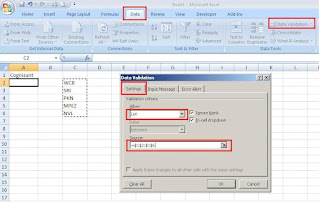
Excel enables us to restrict the values a user can enter in a cell. by restricting the values, we can ensure that our workbook entries are valid and also the calculations based on them are valid.
Follow these simple steps:
To create a validation list, we first need to type the values we want to include in the adjacent cells in a column or a row.
1. Click on the cell, in which we want to create a validation list.
2. Click on "Data" tab
3. Click on "Data Validation" option.
4. In the "Data Validation" dialog box, select "Settings" tab
5. Select the "List" option from the "Allow" drop down list.
6. Click in the "Source" field and Click & drag the validation entries (the one we have entered in the excel file)
7. Click on "Ok" button.
Now, the Excel will create the validation list, in the cell we have selected it.


No comments:
Post a Comment