Windows Explorer caches DLLs (Dynamic-Link Libraries) in memory for a period of time after the application using them has been closed. This can be an inefficient use of memory.
1. Find the key [HKEY_LOCAL_MACHINE\SOFTWARE\Microsoft\Windows\CurrentVersion\Explorer].
2. Create a new sub-key named 'AlwaysUnloadDLL' and set the default value to equal '1' to disable Windows caching the DLL in memory.
3. Restart Windows for the change to take effect.
I tried this after running a intense program, then watched the task manager; memory recovered it self.
Source: www.tweakxp.com
Showing posts with label Files. Show all posts
Showing posts with label Files. Show all posts
Tuesday, April 06, 2010
Saturday, December 19, 2009
Need to know more about file extensions?
Its a very intresting site to search more about the file extensions….
There are just TOO many of them this days.
ComputerFileExtensions.com that seem to be a nice resource for file extension and file formats.
On that site there exist a big database of all kind of file extensions you may come across and a good search facility to make it easier to find any file type you may looking for. I found there MXML and as too. Anyway, there is a way to see details on each file extension and it tells that extension.
Wednesday, August 05, 2009
Folder Option Missing
Many of us sometimes find the folder option missing in the windows explorer.
Here is the solution—>
1.Open Run and Type "gpedit.msc"
2.Now goto User Configuration>Administrative templates>Windows Component>Windows Explorer
3.Click on windows Explorer you will find the thrid option on the right side of screen "Removes the Folder Option menu item from the tools menu"
4.just check it,if it is not configured then change it to enable by double clicking on it and after applying again set it to not configured.
5.I hope that you will find the option after restarting windows.
Thursday, July 02, 2009
Setting password for MS Office files.
Have you know about setting password in MS Office documents it is very easy.
- While saving the document ,Click Save as button ,the save as dialog box will open,in that you have tools button at the left bottom corner.
- Just click it and select General options .
- General options dialog box will open ,and in password to open box enter the password for the document and click ok.
- It will ask you to retype the password for confirmation ,type the same password and click ok.
- Now save the document and open it again.
Wednesday, June 10, 2009
How-To: Copy Excel cells into a Word document!!
Just thought of writing about one of the pain points i often come across while working on Excel and Word. Whenever we try to paste some excel cells into Word, the usual problem faced is the loss of formatting. This can be overcome by following the steps mentioned below:
1.Select your cells in Excel, copy (Ctrl+C) then in your Word document, on the Edit menu,
2.click Paste Special
3.Click Microsoft Office Excel Worksheet Object, and then click OK
Note: If you are using word 2007 then press ALT+CTRL+V. This reduces formatting problems between Word and Excel.
1.Select your cells in Excel, copy (Ctrl+C) then in your Word document, on the Edit menu,
2.click Paste Special
3.Click Microsoft Office Excel Worksheet Object, and then click OK
Note: If you are using word 2007 then press ALT+CTRL+V. This reduces formatting problems between Word and Excel.
Wednesday, April 15, 2009
How To free Your hard disk space?
"How you can free some 100-500 Mb space from your hard disk in windows operating system?"first i will tell you about temporary files that takes lot of memory space in your hard disk.This is simply created when your do any work in xp for example if you are writing any document,installing any software's or visiting web pages.In windows Every work done by You is stored by Operating system as temp files. So,delete this files to free your space.
If you are reading this for first time ,i am sure that 200-400 mb space in your computer is taken by temp files. so, go and delete these files by following methods:
1. Start Run Command. or press windows key + R at a time .it will open a dialog box ,type there %temp% and enter . It will open a folder. Delete all these files. It is of no use and taking your hard disk space.
2.Start Run Command. or press windows key + R at a time .it will open a dialog box ,type there prefetch and enter . It will open a folder. Delete all these files. It is of no use and taking your hard disk space.
Sunday, February 08, 2009
CONVERTING FAT32 to NTFS in Windows XP:
1. Open Command Prompt. Click Start, point to All Programs, point to Accessories, and then click Command Prompt.
2. Else Press WIN+R key in the keyboard
3. In the command prompt window, type: convert drive_letter: /fs:ntfs
For example, typing convert D: /fs:ntfs would format drive D: with the ntfs format. You can convert FAT or FAT32 volumes to NTFS with this command.
Important Once you convert a drive or partition to NTFS, you cannot simply convert it back to FAT or FAT32. You will need to reformat the drive or partition which will erase all data, including programs and personal files, on the partition.
Tuesday, January 27, 2009
Document Retrieval Concepts
Document Retrieval Concepts:
Document: A unit of retrieval. It might be a paragraph, a section, a chapter, Web page, an article, a whole book, or images and video.
Index: A data structure built on the text to speed up searching.
Index Term( or keyword): A pre-selected term which can be used to refer to the content of a document. Usually, index terms are noun or noun groups. In the Web, however some search engines use all the words in a document as index terms.
Information Retrieval(IR): Part of computer science that studies the retrieval of information(not data) from a collection of written documents. The retrieved documents aim at satisfying a user information need usually expressed in natural language.
Logical view of documents: The representation of documents and Web pages adopted by the system. The most common form is to represent the text of the document by a set of terms or keywords.
Precision: An information retrieval performance measure that quantifies the fraction of retrieved documents which are known to be relevant.
Query: The expression of the user information need in the input language provided by the information system. The most common type of input language simply allows the specification of keywords and of a few Boolean connectives.
Recall: An information retrieval performance measure that quantifies the fraction of known relevant documents which were effectively retrieved.
Wednesday, November 19, 2008
Excel - Tip -2
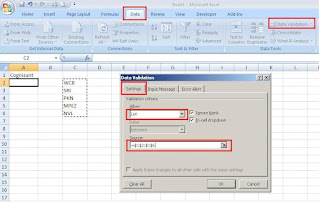
Excel enables us to restrict the values a user can enter in a cell. by restricting the values, we can ensure that our workbook entries are valid and also the calculations based on them are valid.
Follow these simple steps:
To create a validation list, we first need to type the values we want to include in the adjacent cells in a column or a row.
1. Click on the cell, in which we want to create a validation list.
2. Click on "Data" tab
3. Click on "Data Validation" option.
4. In the "Data Validation" dialog box, select "Settings" tab
5. Select the "List" option from the "Allow" drop down list.
6. Click in the "Source" field and Click & drag the validation entries (the one we have entered in the excel file)
7. Click on "Ok" button.
Now, the Excel will create the validation list, in the cell we have selected it.
Saturday, November 15, 2008
Excel tip -1
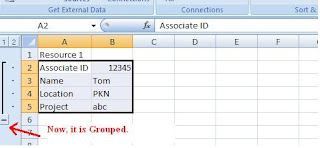
Hide Rows by Grouping
Using the Grouping option present in the Excel, we can hide the set of rows / columns.
Follow these steps,
1. Select the rows / columns that we need to hide.
2. Click on "Data" tab
3. Click on "Group" option
4. In the Group dialog box, select Rows/Columns option.
5. Click on OK button
Now, the Excel will create a clickable button on the far left or top of the worksheet. The button displayed either minus or a plus sign, depending on what is displayed in the worksheet

Monday, September 15, 2008
How to hide a file in image
How to hide a file in image -
1. Gather the file you wish to bind, and the image file, and place them in a folder. I will be using C:\New Folder-The image will hereby be referred to in all examples as fluffy.jpg-The file will hereby be referred to in all examples as New Text Document.txt
2. Add the file/files you will be injecting into the image into a WinRar .rar or .zip. From here on this will be referred to as (secret.rar)
3. Open command prompt by going to Start > Run > cmd
4. In Command Prompt, navigate to the folder where your two files are by typingcd location [ex: cd C:\New Folder]
5. Type [copy /b fluffy.jpg + secret.rar fluffy.jpg] (remove the brackets)
Congrats, as far as anyone viewing is concerned, this file looks like a JPEG, acts like a JPEG, and is a JPEG, yet it now contains your file.
In order to view/extract your file, there are two options that you can take
a) Change the file extension from fluffy.jpg to fluffy.rar, then open and your file is there.
b) Leave the file extension as is, right click, open with WinRar and your file is there
Subscribe to:
Posts (Atom)


